Fixing things and the future of society.

Tuesday, December 27, 2022

Titan owner: WHY am i blowing wheel bearings? Can’t seem to keep one for more than a few months. Thought it was the wheel bearings so i went with precision’s this go around but still no luck. The truck has a full 6in fab tech lift and 20x12s truck did great for a good while but now I’m even scared to drive at interstate speeds. It’s also began to wear out my front tires on the inside. Has new ball joints ,wheel bearings, control arms, fresh alignment. I did notice my rack and pinion bushings are shot. Would that cause that ? Thanks in advance.

Intelligent Tinkering: Your alignment is out, for sure, whether you had it done or not. Uneven tire wear is usually an alignment issue unless the bearings were loose for a really long time, which is not that likely because when they're loose they degrade fast. If your tires are getting "cut" ie, worn just on one edge, that's one kind of alignment issue. If they have the somewhat rarer camber wear, which is when the unusual wear starts out deeper and decreases gradually across the face of the whole tire, that's a different kind. "Cut" tires are typically due to toe issues, involving tie rod adjustments, but a loose rack may do this too, while camber wear means the whole wheel is tilted in or out, and you need camber bolts or the camber bolts you have need adjusting, or replacing and adjusting. This is an oversimplification, and there are other possible issues you may have going on, but it may help you diagnose things. I would check and fix or replace the rack, examine the tie rod ends, ball joints and bearings and replace anything loose, then learn to do the home alignment with two pieces of string and a carpenters level. It's time consuming but you get a better understanding of the condition of your truck's front end that way and can then be a more knowledgeable consumer of professional alignment services. I took my lifted first gen Titan to two alignment shops before I realized that the camber bolts were stripped on one side and not working properly. The alignment techs didn't catch this.I discovered it while trying to straighten everything up myself with two long bits of mason's line and a four foot level. New camber bolts on that side did the trick. I had to replace the LCA too, though, because one camber bolt was seized in its bushing. The alignment techs had both tried to adjust it and not noticed that this was the case.

Sunday, December 18, 2022

Titan trailer connector -- running lights won't work

Titan owner: Ok, have a question. I just bought a 04 titan and I have brake lights and turn signals but no running lights on my trailer plug I’ve checked all fuses and I still have no running light. I’ve got no power on the running light wire going to plug. What am I missing here any one know anything that I’m missing?

Intelligent Tinkering: But the truck's running lights are working, right? So you can bypass the faulty trailer pigtail and/or pigtail connector just for that one line. Take a 12V test light, dismantle the rear lamp unit on the truck, find the wire that goes to the running light there, test it for 12V and splice into it to go to the trailer plug. If you'd rather, you can trace from there to the pigtail and fix it properly, but the bypass will work fine too.

Friday, December 16, 2022

Heat pump compared to natural gas boiler in Maine

Questioner: With CMP hiking rates, is a heat pump still efficient enough to cost less than running my gas boiler?

Intelligent Tinkering: It depends on the heat pump and boiler specs. But generally, if you calculate your annual gas consumption from the bill, multiply it by either 91,500 BTUs per gallon (propane) or 1050 BTUs per cubic foot (natural gas), times the percentage efficiency of the boiler expressed as a decimal (usually about 96% for a modern boiler), you'll get your heating season BTU needs (BTUs per year). You then need to divide that by the BTUs/hour capacity of the heat pump (the rated capacity on the outside of the box, usually expressed as a few thousand BTUs/hour, so say 18,000 BTUs/hour, or something like that) and you'll get the estimated annual hours of full load running time for the heat pump. From that, using amps or watts draw of the pump (watts is amps times volts and a watt hour is a watt sustained for an hour), you can estimate the kWh needs and then the kWh cost. You can figure 20% either way, especially for an inverter model pump, because the mid load efficiency may be more or less than the full load.

Tuesday, December 13, 2022

Prospective bus owner: Are 1979 VW bus, fuel injection, type 4, 2.0L engines hard to remove and rebuild compared to say a 1970’s upright bus engine? Thank you.

Actually looking at buying a 1979 bus where engine doesn’t run OR a 1970 bus upright where engine does run.

Intelligent Tinkering: If you're planning a full rebuild, and have access to a decent shop, it's actually slightly easier to remove the Type 4 with a lift and a heavy stand about four-five feet high, just tall enough that you can stoop to reach the last few fasteners and get full clearance when you raise the vehicle away from the lift. I believe, but don't know for sure, that this was the technique the dealers tended to use when these things were new. Mine is just a heavy wood frame, but a very strong transmission stand, one meant for big trucks, might work too. I leave the transmission attached, disconnecting the cv joints and shift rod and front transmission fork-mount instead. This saves having to futz with the two top engine-to-bell housing bolts, which are not terribly hard to reach, but still pesky at times, and you can then inspect the transmission and CVs and service the nose-cone parts in full daylight. The transmissions are fairly solid. I have only had two in 480,000. But they have their minor issues too, so it's best to take a look at them if you plan on doing the engine. It would be a shame to have a nice running engine then get stranded somewhere for a worn nose-cone ball or something like that. And yes, I've had a few dropped No. 3 cylinder exhaust valves over the years. That cylinder is furthest from the old pump. The heads are the weak point. I rebuilt the ones I had for years but then got refurbished ones on my last rebuild about 20,000 ago, made a big difference. New heads and a new oil pump should set you up.

Sunday, December 11, 2022

VW engine bottom end doesn't turn easily after rebuild

VW bus owner: I have my engine case, crankshaft, and flywheel assembled. No camshaft, no distributor drive, no connecting rods.  The case halves are clamped with the six large bolts (only), torqued to spec.

The crank endplay is set to 0.003". The bearings and journals are coated with assembly lube and motor oil.

The crank turns easily and smoothly, yet there is one spot in the rotation with just a little more resistance than the rest. The crank won't "coast" through this spot at a very slow speed.

Is this expected / normal?

Intelligent Tinkering: It's possibly a bit of work debris, a thread of cleaning rag or or something like that on a bearing surface, but it could be a pinched or off-round bearing too, or an off-round journal that has been "hammered" and that wants a line bore. The engine turns. That's something. You could take a flying chance that it is actually debris AND softer material than the bearing and so will get better once started and run. You'll know if you turn the crank pulley later, once it's installed and run. You'll feel it, and you know what it feels like already. VWs are renowned for being able to run and give service for long periods with internal damage that would fry a less tolerant engine in minutes. Or, and this is the "right" answer, you can take everything back apart and look for someplace on one or more bearing surfaces with discoloration or other signs. Pinched bearings can be ground on the ends (with fine wet-and-dry Emory cloth) to make them fit better. Biting the bullet like this is wearying and isn't easy, but it will pay off. I find that I get more at skilled and dismantling and mantling complex assemblies if I have to repeat steps, and it always goes faster than you would think. Engineer's blue can be used to find binding and pinched bearings that don't show obvious signs of damage. If you don't find obvious damage, rebuild to this stage again with blue, then dismantle again and you'll find it. 

How to troubleshoot old VW bus starting and ignition circuits

Bus owner: I bought the Gus Bus and ran it through the car wash. It died in the car wash. It was idling just fine and then it just died. Didn’t even sputter. I had it towed home. No lights would come on or anything when I turned the key. I posted and people said to check the fuses. Two days later the lights did came on when I turned the key, but that was it. The battery was prehistoric and barely held a charge so I replaced it. Today I dove into the fuses. There was one that was definitely bad. The metal was broken. These are the other ones. How do they look? Can they be bad even though the metal is not broken? Gus still didn’t start. Lastly, what would I check next? TIA. 

Intelligent Tinkering: Get a VOM and 12 V test light. Study the instructions for the VOM. Focus specifically on the 20V DC and continuity settings. Test for 12V at the coil + terminal. If there isn't any power there, jump it from the battery with a wire and two alligator clips and try for a start. If it turns over and fires or starts you found your problem. Use the two settings to find out why there is no power to the coil and fix it with new wire or connectors as needed.  If it doesn't turn over, you may have two problems so now troubleshoot the starter circuit. Disconnect the alligator clip for now so you don't melt your coil. Measure the voltage across the battery terminals. It should be 12.5V, or at least above 12V. If not 12.5V, disconnect and charge it until it is, or if it won't hold a charge, get a new one, or "rob" some other vehicle of a known good used one to use for testing. (This is where it helps to have a buddy with some yard trucks and junkers.) Then reconnect and try again for a start. If instead you get 12.5 V right off the bat, take the VOM to the starter solenoid terminal. You roll under the bus with the wheels chocked and gear in neutral (waist measurement must be less than 36") and measure voltage at this terminal, which is or should be a 13 mm nut, with the key held on to the starter setting. Vice grips and six feet of string or a buddy help here to hold the key on. You may need to take a piece of sandpaper to clean up a spot to make a clean ground on the bell housing or some other piece of engine aluminum. If you have 12.5 V here, the starter solenoid should at least click. If it doesn't, take the starter off -- two bolts and three connections. Remember where they go. Bench test it, with the spare battery and a pair of jumper cables. A big vice helps here. If it doesn't turn at all on the bench with a known good battery, get a new starter and fit it, and reconnect the alligator clip and try for a start. If it does turn, clean up the contacts, reassemble it to the car, and troubleshoot the wiring from the battery to the key and back to the solenoid using the 20VDC and continuity settings on the VOM. There are no fuses in this circuit. An easy test is to jump it using one side of a jumper cable, car chocked and in neutral, right to the solenoid terminal. If the starter clicks or turns, you faulted the battery to solenoid wiring and you may need to replace some of this wiring, or use the old relay mod. Start a new post for the relay mod instructions if that's where you end up. Otherwise, once you have a turning starter, reconnect the alligator clip to the coil and try again for a start. It should start. If it does, troubleshoot the wiring to the coil. If it doesn't get back to us with a fresh post.

Friday, December 9, 2022

Titan owner: My frame and suspension is starting to show its age on my 06. Has anyone found any success with grinding/ surface rust converters and paint? Want to try to slow down the issues I’m starting to see!

Intelligent Tinkering: I spray POR15 on all my vehicles, refreshing once a year. Then sometimes I add Fluid Film on top of that too. I have an outdoor lift, which makes it easier. You can pressure wash the underside thoroughly beforehand. If you dilute POR 15 heavily with Zylene about 50-50 or 60-40 (experiment beforehand) it sprays well from a pneumatic sprayer. A gallon will do several vehicles. You have to be ready to clean the pot quickly (Zylene again) or it sets up in no time at all, especially on a humid day in summer. I use a dedicated gravity feed HPLV pot, a cheap one, and stand ready to toss it after only four or five uses. It's cheaper than a new truck. And you need to suit up and wear a decent respirator and goggles. The stuff is very toxic, and it sets up with humidity so just a tiny droplet in your eye or lung becomes a small rock. In general it can save the outside of your frame for many years more service, even here in Maine, but my Titan is rotting from the inside out too, so it's not a perfect answer. A heavier truck, like a big GMC, would last longer because the metal is thicker. Fluid film is just "belt and suspenders" too. There are guys around here that specialize in these coatings, so you wouldn't need to do it yourself if there are some wherever you are.

Thursday, December 8, 2022

VW bus runs rough on cold start

Bus owner: Might be a broad question, but what is the main cause of a rough and sputtering idle with a cold start. 1978 Westy Fuel Injected. the bus really sputters and struggles for the first 1 minute or so. Thanks!

Intelligent Tinkering: Poor idle on cold start is typically mixture too weak, whether EFI or carbs. The gas has to vaporize correctly for the motor to settle down. If it fires up right away and then runs rough, the cold start valve is probably working (and so the thermo-time switch is too), so I would suspect fuel pressure or some other aspect of fuel delivery after the cold start sequence. If it doesn't fire up right away I'd suspect cold start. You would have to rule out weak compression and bouncy timing issues to be certain. Thin rings or a worn distributor driveshaft wouldn't help matters either. But everything is relative. How rough is it? A lot of VWs are like this. I have a 75 with twin carbs that fires up right away and then likes at least thirty-forty seconds to settle down before you can goose the throttle. A second too soon and it will cut out. It then proceeds to run like a top all day. You could take the Zen route and use those few seconds for something else. The "How to Keep your VW Alive" author, John Muir, suggested rolling a hand-rolled cigarette while waiting for the engine to settle. I suppose these days we would all check our phones.

Monday, December 5, 2022

Rebuild our Kubota B6000 ourselves?

Kubota owner: G'day all.

My 14yo son is wanting to attempt to restore an old B6000 that's be sitting a few years now on the farm here. Wanting to start with an engine rebuild. I'm sure as no mechanic. I was wondering if it's something we will fumble our way through ok? or if there is any vids or help guides to get or advice anyone has we would really appreciate it.

Intelligent Tinkering: The Kubota B6000 is a good candidate for this, although there is some new gear that will be needed: jack stands and good sockets and calipers and so on. This is all a nice excuse to go Christmas shopping for yourself. It certainly isn't so heavy you need a winch to split it. You can manage with jack stands and a floor jack. The difficulty will be when you encounter a seized fastener or some procedure that requires a "knack" you don't just have. You can spend hours, days even, just trying to shift one seized nut, if you don't have the reservoir of technique and gumption that experienced mechanics build up over decades. What I would suggest is finding a "spare" mentor for your son that does know these things to hold in reserve when you get stuck. There's no shame in this. All the experienced and able craftsmen were callow youths themselves once, and some cunning old bar steward took pity on us then (while others gave us the brutal hazing we probably deserved!) As for videos and such, you need a manual for a rebuild because you need the specifications. And make sure you have a machine shop in the vicinity that will do the specialized work on the case and other components: boring, line boring, and so on, and that you can source the oversized components. Machine shops are kinda thinning out the last few years and those that have survived are getting more specialized. Look for one that still has old guys that can use manual, not computerized equipment. There won't be a program for this machine.

Sunday, December 4, 2022

Titan misfires on shift

Titan owner: Anyone have a problem with your truck cutting out while shifting in tow mode, was pulling a 6000lb trailer. It made the check engine light come on.

Intelligent Tinkering: Lots of us first gen owners have had a problem with the transmission crapping out, overheating and fading out, usually when NOT in tow mode and/or not 3rd gear and when towing heavy loads for long distances at relatively high speeds. But not the engine. But this isn't much info. Was it just as you pressed the tow mode button? Is that what you mean by shifting? Or was it in tow mode already and shifting gear normally? Did it cut completely and shut down? Or cut momentarily and pick up again? Does it run now?

Titan owner: It's a 2017 5.6, just bought this truck. It has 72000 miles on it. Just hooked up to my trailer and took off in tow mode .I would say I was coming out of second gear and as the rpms were peaking to shift it started to flutter so I let up on the accelerator and then slowly tried it again and it shifted fine.Then it did the same thing. Still runs fine but it cause the check engine light to come on.

Intelligent Tinkering: Pull the codes. Then try clearing the codes and see if you can make it happen again in drive and then again in the next gear down so it hits that same rpm but doesn't shift. Run this test a few times to be on the safe side. You'd like to know for sure that it isn't just a simple misfire that happens at that same rpm. Two repeat occurrences under the same conditions is better than one for diagnosis but still not a slam dunk. Chances are still fair to middling that it's not connected to the upshift, and you'd like to know for sure. But if it is there's an explanation: on most electronically controlled transmissions the TCU does send a signal to the ECU to change the timing on gear shifting, and if the value the ECU gets is wrong you can get a misfire or loss of power. I'm not sure if this applies to the Titan, but since it does have a separate TCU this seems likely.


Later:

Titan owner: Just took the truck out and drove it with and without tow mode and it did just fine, but wasn't pulling a trailer. Will take it to the dealer and see what they say.

Intelligent Tinkering: I hope they manage to understand what you're trying to tell them -- a big "if" because you're talking to the "service associate," not a mechanic. Getting through to these desk-bound numpties is very hard sometimes because they are trained to discredit what the owner says. It's true the the average owner knows diddly squat and misreports symptoms and invents them in their muddled head, so we perhaps can't blame them for that. But the whole corporate "customer experience" interface bullshit makes life hard when you have a real engineering problem to report and solve, especially one that can't be replicated unless the tech goes for a test drive with a 6,000 lb trailer. But they will probably say that a couple hundred rpm drop is not unusual when upshifting with the heavy load. This is for the reason given earlier: TCU tells ECU to retard the timing momentarily on upshift. What is unusual is that it caused a misfire. We assume that's what it is, since you haven't pulled the codes. But that's the most likely explanation. (The P300 code series.) So make sure they hear that loud and clear. Good luck. (You'll need it.)

Test an alternator

Camry owner: 1997 CE V6 4 door. New battery, New alternator. Voltage at battery reading 11.5V, fuses good but there’s no voltage coming out of alternator. It is brand new, would that just be a faulty alternator or is there something else I can test?

Intelligent tinkering: First just make sure you haven't disconnected the alternator to test it, because, sorry, but it sounds like you have. The stock alternator needs a field coil charge to work, so you test it connected as normal with the engine idling. It should be 13.5 to 14 or so volts across the battery terminals. (This is not true for a permanent magnet alternator, usually found in ambulances and food trucks, 12V generators as in an old VW, or dynamos found in old tractors and whatnot. Those will make power without field charge.)

Get an energy audit!

Homeowner in FL on Reddit: Hi all. We have 15k saved for energy efficient improvements. The goal is to use less fossil fuels and preferably to deploy this money in a way that it has a pay back period. How should we do this?

(Followed by fifty comments, some of which are helpful.)

Intelligent Tinkering: You can keep guessing, or use Reddit to get what is hopefully a more inspired guess, or do an energy audit, either by yourselves or with an energy professional. The purpose of an audit is to find the most cost-effective ways to reduce consumption. It's essentially a rational comparison of alternatives. There are books and how-to websites and even online calculators if you do decide to do it yourselves. In Maine we subsidize audits using money from taxes on greenhouse gasses. You can get a free one if you are low or moderate income, and a subsidy of $500 towards one if your income is higher. It's well worth it. A good audit done by a professional will include a blower door test, which finds all the leaks in your home and measures the heat loss/gain directly. I don't know for sure, but somehow I doubt they are subsidized in Florida. You could subsidize lots of audits if you levy a tax on the specious hot air that comes out of Florida politicians mouths, especially when it comes to climate and energy!

Saturday, December 3, 2022

VW brake lights

VW owner: 78 Westy. My brake lights only come on when the headlights are on. Any clues?

Intelligent Tinkering: There will be somewhere be a crossed wire,  failed connector, or, if you or someone has messed with it recently, an incorrectly wired connector. If someone has messed with it, most likely under the dash in or close to the fuse box, otherwise most likely in the rear light units, or possibly on the master cylinder. Need a 12 V test light, a VOM with continuity setting, a logical mind, and some patience.

(Later, after the owner changed his question to state that the brake lights just won't come on at all.)

This is just a brake light failure. Tails and heads are nothing to do with it. We assume you've checked the fuses. If so, use a bit of two by four to wedge the brake lights on against the seat pedestal, then look for 12V with a test light or VOM at the bulb. If you find it, suspect ground or bulb. If you don't, suspect the two switches on the master cylinder. One hot in each is for the brake warning light on the dash, the other is for the actual brake lights. Pull off the two three prong connectors and search for 12V with the test light connected to a known good ground. You can find the pin-out online. If they don't have 12 V then you have a bad wire back to the fuse. If you find 12 V, jump the switch to see if the brake lights come on. You only need to jump one, since they are redundant. If the lights come on, replace the switch (s). have the new one (s) ready before you take the old one (s) off or you'll be bleeding brakes.

Enphase solar: WiFi problems.

Enphase owner: Does anyone have problems connecting their router to Enphase wifi. I have emailed the support centre numerous times without a response.

Intelligent tinkering: Simple test: If your iPad or WiFi-operable cell phone can't see the modem from wherever your Envoy is, then neither can the Envoy. Get an ethernet cable or a WiFi range extender. If it were me I'd use a cable. One less thing to break.

Migrated over from the old teaching blog:

Three weeks ago Sunday, a bad thunderstorm sent out a lightning bolt which hit close by our small farm and took out a sheep fence charger, a microwave that was already glitching, the Internet (DSL) remote, and, as we eventually discovered, the motherboard for our solar PV system's Envoy 3 "combiner" box.

It also terrified our kid, who wouldn't stop crying and worrying about it for hours, and is still afraid of thunderstorms. But that's another matter. 

(We live on a hill and have experienced close strikes before. But none have hit this close since Edana was born.)

What follows are instructions for testing and replacing the motherboard. 

This is designed to be helpful for owners that want to fix their own stuff. 

Enphase is a popular brand of solar PV kit, but like a lot of corporations these days, their preference is for "professionals" to do the work if repairs are to be made. They may have heard of the "right to repair" but they maintain a two-tier information system. The owners get only a certain amount of information, and have access to an online interface that gives them nicely turned-out graphs and charts so they think they can see how their systems are doing, but the online system updates only every six hours, and is not helpful in diagnosis. "Professionals," on the other had, have access to "Installer Toolkit," a separate and more complete online interface that allows real-time connection to the system. They also have access to a separate part of the corporate website where they get better manuals.

As Matthew Crawford pointed out in "Shop Class and Soulcraft," there is nothing more pathetic than a modern man or woman mystified and infantilized by the high-tech gadgetry he or she owns but can't repair or even understand. We have become by historic stages the owners and users of powerful technology, gadgets of all shapes and purposes with previously-unimaginable labor-saving abilities and convenience, but we can fix none of it ourselves because fixing -- learning how to use tools and reason to make things that have stopped working work again -- is unfashionable. 

We are told by modern culture that gainful employment requires a college degree. Apart from a few science labs, that degree will be almost all taught in the classroom or worse, online. And children thus spend their apprenticeship years, the years they should be learning to use their hands and brains together, using only their brain and only a small part of the brain at that. It's no surprise that only a small minority of folks ever learn to fix anything more complicated than a Lego set. This is a major problem for society in many ways. Most importantly, it creates a kind of aura of invincibility and invisibility around technology that few penetrate.

And then we wonder why there are so many conspiratorial nutcases and Q-freaks around. They don't understand "normal" society because, never having been taught or learned anything about our complex society and the technology that runs it, they make stuff up about in their heads and share it on the Internet.

Needless to say, I accepted none of this conventional wisdom during my own thirty-year academic career and advocated for a fuller understanding of human intellect, to include doing as well as thinking, fixing as well as researching, and best of all yet thinking while doing. 

The great thing about technology is that it doesn't freaking care what you think about it. There are no "alternative facts." It has only one reality: working or not, and making it work again when it stops requires you to interface with that real world and experiment using trial and error, getting real information, and responding to that real information with actions based on logic and reason. 

I fix, therefore I am. And by fixing, I am more complete a human. Richer in many ways, not just financially. I am, as Crawford says "master of my own stuff."

Now I'm retired, I don't have a classroom and teaching workshop anymore in which to deliver this philosophy, just this blog. So this is my soap box.

Back to Enphase. These instructions are for the "Envoy IQ Combiner 3" combiner box, which is best described as a "smart" electrical sub-panel. There are other Enphase set ups and even other Envoy set-ups. You may be able to adapt the instructions for your set up. Let me know if this is is or isn't the case. My email is to the right.

The Envoy IQ Combiner 3 has a normal circuit breaker "bus" bar, but also a microprocessor "brain," the Envoy itself. The brain connects to both the PV inverters and the Internet, and sends data and instructions from the Internet to the inverters ("microinveters") (one of which lives behind each solar PV module in this kind of system), and also sends data back to the server at the Enphase corporate HQ.

Fry the brain, and everything stops. The inverters are designed to shut down if the brain quits, because they are programmed to national and state-level safety protocols called "grid profiles" that are designed to keep them from exporting power to the grid during a power outage and also (in some states) at different times when the power is not needed or the power company doesn't wish to purchase it back from the owner.

If you get a lightning strike and your PV power quits, the first thing you will notice is that your Enphase website doesn't show power production. this is what it looks like when everything is working correctly:


Notice that it says "system normal" up in the top right corner. 

Next you will go to your Envoy combiner and open the two catches. There are normally four LEDs that light up, at the top right of the black "dead panel." If the LEDs are off or one or more of them is red then you may have a problem. in my case all four were off.

BTW, the dead panel is there for your safety. It's to stop you from sticking your fingers in the works and getting a shock. 

But it's also there to stop you from fixing. 

Take the bloody thing off. That's right. Penetrate that aura. Get under the hood. Yes, it can hurt you. But, as Ed Abbey said many times, it's your God-given right to make a fool of yourself or kill yourself if you want to. Four Phillips number three screws, one in each corner.

If you don't know what a Phillips number three screw is, look it up. Call it adulting.

No need to switch the breaker off. You're going to need it on. Just don't touch the shiny bus bar conductors or any other live parts and you'll be fine. If you do touch them, you'll get a nasty 110 volt "belt" but unless you are already on the verge of a heart attack, this will not kill you.

Then take a volt-ohm meter or multimeter and switch to the alternating current setting. That's the one with the wavy line symbol. Set it to the first notch higher than 220V, usually 600 or 700V. Take the black and red probes that came with the meter and, being careful not to touch any metal parts, test for voltage at the PV breaker. this is the one that connects the wires from the inverter string to the bus. You should see between 220 and 240V, give or take.

If you have voltage at the PV breaker yet all four LED are "off" this power all comes from the grid, not your solar array. But this tells you that the problem is in the solar system, not the grid connection. If you don't have power, troubleshoot back to the entrance panel using the same technique and meter and care not to get electrocuted to find out which bit of your home's internal wiring has gone awry. 

If you do have power it's still possible that the lightning fried the inverters, not the Envoy. Enphase has a lengthy troubleshooting procedure in the manual for the inverters. Possible, but unlikely. The inverters have better protection against lightning strike. So because of this unlikelihood, and because it's easier to get to, I would check out the Envoy before I ran this procedure.

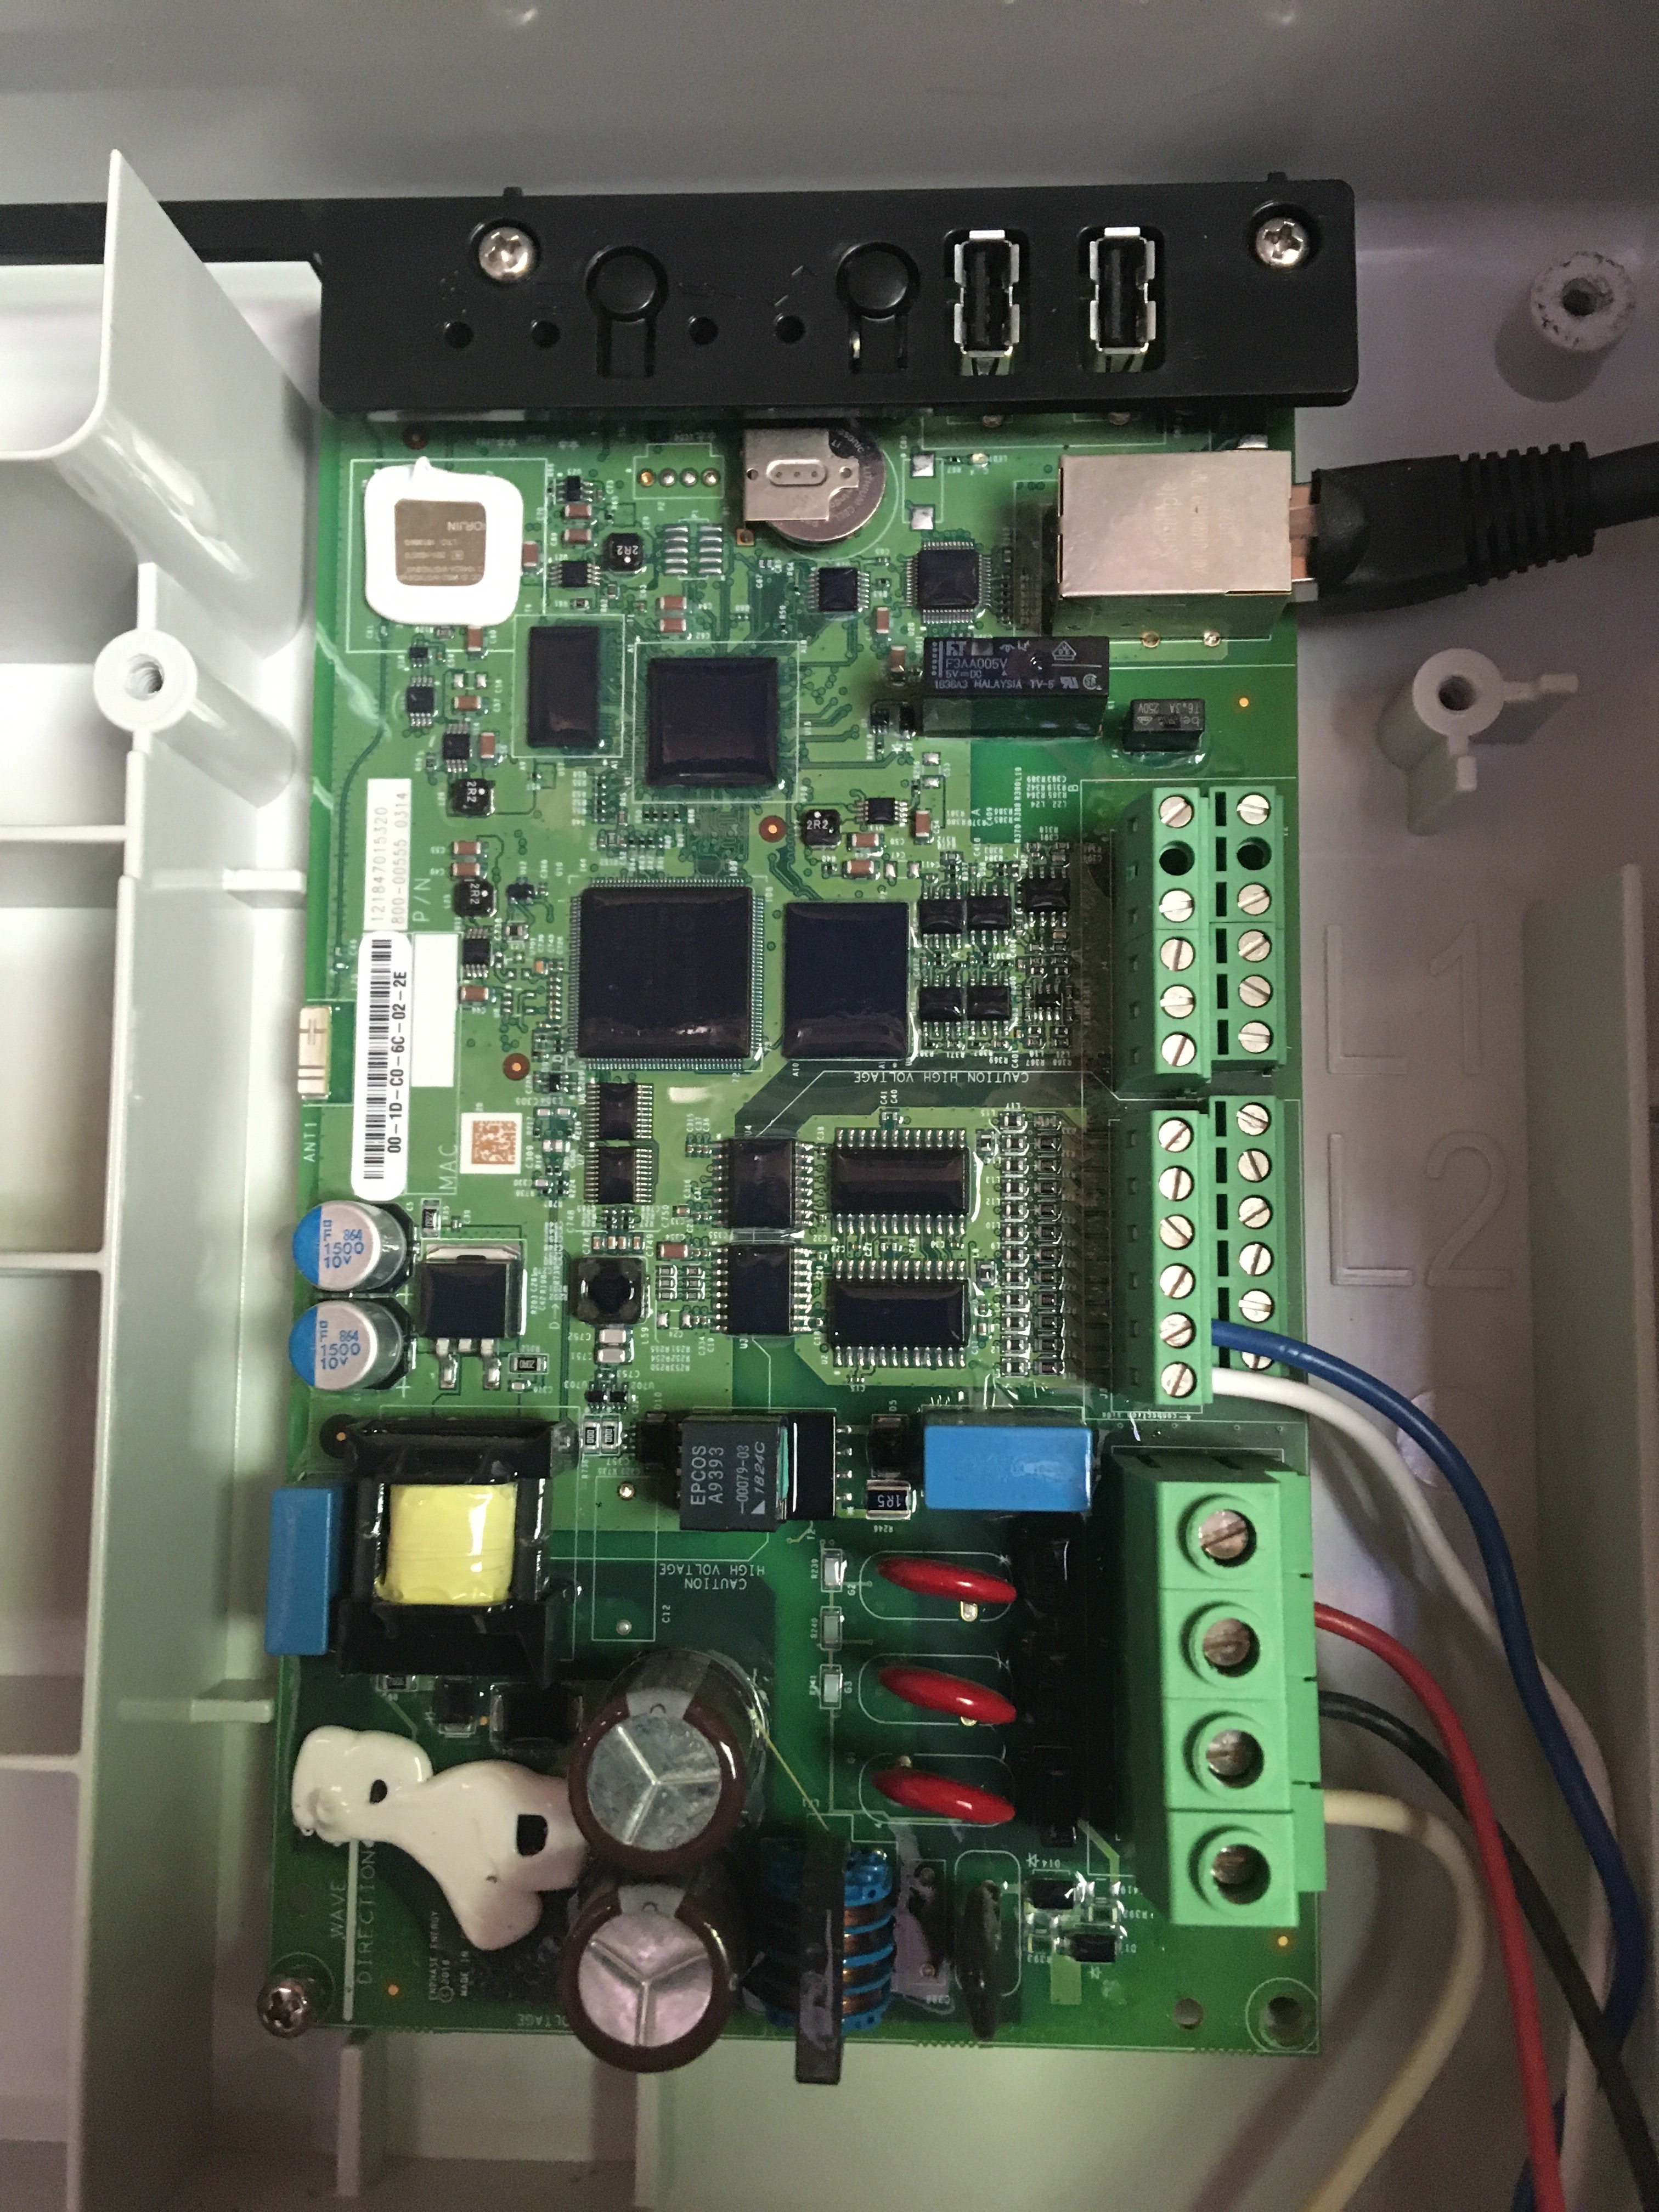
Now it's time to turn off the solar breaker in the power entrance panel. Then use your meter or one of those 110/220 voltage detector pen-shaped thingies to double check that power is off. Mine is made by Klein and very reliable. Once you have done this, use your cell phone or tablet to take a close-up picture of the Envoy combiner box wiring for reference. Here's the one I took:


I didn't need to photograph the breaker wiring because the cut-outs on the dead panel told me where the breakers should go. You may have more breakers so you may wish to do this.

Then remove the breakers. You don't have to disconnect the wiring. Just pry them gently away from the bus bar. Using a small flat screwdriver, disconnect the wires that go directly to the Envoy, in my case the small white and blue wires from the transducer, the three 220v wires that power the Envoy, and the ethernet cable to the Envoy. Then, using only a Phillips number 3 screwdriver (not a bloody great cordless impact driver) carefully unscrew the Envoy.

If your Envoy got fried by the lightning strike there will most likely be some discoloration of the printed circuit board (PCB). With mine you could smell it; there was a little whiff of burned wiring. There may even be a little soot on the PCB or on the surrounding plastic box, like this (below):


Here's the kind of discoloration you'll look for:


You can see grey marks around the spots of solder where excess voltage has fried the PCB.

Time for a new one. Order direct from Encase using their online shop. Your new PCB will arrive in the mail. You'll fit it, reversing the procedure above. make sure all the connections are in the right place using the picture you took earlier. They sent you a sticker to replace the one you had with the Envoy serial number. this goes on the door of the combiner box. 

Then turn the breaker in the power entrance panel back on. 

You should immediately see four red LEDs where, when your system was working, you used to see four green ones.

Now you have a choice. You can call or chat with Enphase corporate and have them update your Envoy's serial number in the system, then wait for your system to boot up and send data to Enphase and update the Enphase consumer interface, which can take up to 24 hours or more. Once everything is properly booted, you should get four green LEDs and be able to see from Enphase that your system is now working. 

You may need to use the Enphase website or have Enphase themselves update your grid profiles. Rebooting with a new Envoy resets the grid profile. This is a set of instructions that the Enphase server sends to your inverters, telling them when to turn on and off based on local grid requirements.

Here is what Enphase wants you to know about grid profiles.

You can get in trouble with your grid operator if you use the wrong profile. You may need to call them to find out what the profile is supposed to be. The national default is IEEE 1547 2015.

But better and faster than this, you can go to the Apple Ap Store and download "Installer Toolkit" to your phone or tablet. If you have this software, you can switch out the Envoy serial numbers themselves using the "replace Envoy" function, update your grid profiles yourself, and see if the new PCB is working. If it is working your inverters will be pushing power to the grid and you'll see that in the Toolkit interface.

There's some scuttlebutt in comments on the Enphase website that mere mortals can't download use Installer Toolkit, but I was able to get it. Give it a try.

Enjoy.


Compare heating appliance efficiency -- the cheap way

A single largish room: Propane heat or heat pump?

Question

I'm almost finished converting my old two-car garage into a media room. It's got a 320 square feet footprint but has a tall 16' gabled ceiling, Walls are 10 feet tall so the total volume is around 4,200 cubic feet. There is currently no heat or air conditioning. To keep me cool, I can live with just a fan or two in the summer (the rest of the house is 180 years old and was never retrofitted with air conditioning, so cooling isn't paramount to me...but it'd be nice to have).

By the way, the addition is really well insulated. When it's around 32 degrees outside, a single electric space heater can make it warmish in 60-90 minutes and then maintain the temperature at half output.

But space heaters are unsightly and relatively pricey to run.

As I see it, I have three options:

Run a 5,000BTU electric fireplace (as needed) that I already own but haven't installed yet, and call it good.

Install a Rinnai propane heater of about 18,000-20,000BTUs. I've been told the heater will cost about $800, a 150-gallon propane bottle will cost around $1,000, plus the price of propane and professional installation.

Get a heat pump installed. It will supply heat and cooling as needed. I read somewhere that the average heat pump install (incl. the pump itself) costs six to seven grand but that's probably for a much bigger space...and I'm not sure if that's before or after federal and state rebates. Maybe I'd be best off with a heat pump if my out-of-pocket costs are somewhere in the $2,000-$3,000 ballpark. Not sure if that's realistic.

Thanks for any insight/advice!

Intelligent tinkering: Use the fireplace for now. But get a cheap off-market kilowatt meter (thirteen bucks from Amadump) and test the wattage and cost. Run the meter all heating season. Because electric resistance heat is highly efficient, thermodynamically speaking (no efficient losses like a furnace has), the wattage will also give you the estimated BTU consumption for the new room. Then run a simple cost analysis. Divide the installation cost of the two other options by the difference in estimated annual running costs between the electric heater and them, based on their specified BTU output, their efficiency, their fuel consumption or amperage draw, and the cost per unit for that kind of energy. This is just some simple math, and will give you the payback in years, ie, how many years it takes to pay off the installation using the savings. BTW, you can get DIY install heat pumps from Home Despot and other outlets. We picked up an off brand one from them four years ago now for $700, 18K BTU, still going strong.

Mercruiser electronic ignition

Mercruiser owner to list serve: Just thought I’d share some information with you all that I have recently learned.

I installed a new EST distributor to my 3.0 TKS engine as I was having some issues which pointed towards ignition.

Anyway, what I have found is anything other than using an original quicksilver marine unit will not work correctly as the base map in the non original ignition module is for automotive use and therefore different and does not advance timing until 2500rpm.

The module for marine applications advances at 850rpm.

After trying various different non original distributors I was not able to enter the module into timing mode making them totally unusable.

Various marine company’s online will have you believe non OEM distributors are the same, but they are 100% not.

Intelligent tinkering: That's interesting and good to know. I was thinking about switching. I have a vacuum-advance electronic distributor in my old VW bus and love how reliable it is. The OEM contact breaker distributors for mercruiser have centrifugal advance. So electronic ignition modules that are fitted under the rotor of your own or a reconditioned distributor would still advance correctly, assuming the mechanism still works. I think the benefit of an electronic ignition system is that you have something more reliable. I'd hate to discover my points needed reset while heading for a lee shore on a windy lake or worse, the sea. But the fact that you can fix a points-based distributor in the water counts for something. I'm definitely a fair weather boater, so that takes the sting out. I don't think I'll switch just yet, but if I did I'd get one with the old centrifugal advance system.

Sheep prevent Zen


Fuel, fire, compression

Someone on our local community assistance FB page couldn't start their car. I wrote this to help. 

There is a sequence of basic tests to do to repair a non-starting vehicle or any gas piston engine. You do them in order and do them thoroughly, so that you are sure you've eliminated each cause as you go. The mnemonic is "fire, fuel, compression." 

Fire means spark. You remove a spark plug from a cylinder, lay it somewhere metal on the engine where you can see it and you're sure it's grounded, crank briefly with the help of a friend if your arms are short, and hope to see a spark. If there isn't a spark, try very hard to check that it was grounded just to be sure. 

Still no? Problem is "fire." You then need to troubleshoot the ignition system. There are too many possibilities under the category of "bad ignition" to go into over FB, but with high miler cars it's often the spark plugs that are so worn that the spark gap is too large. The gap should be around 30 thousands of an inch, which is about the thickness of thin cardboard. No spark and a large gap, change the plugs. 

If there is spark,  because most modern power equipment has fixed timing and electronic ignition, you move to "fuel." If you have an older car, you must first check the ignition timing. 

The easiest test for fuel delivery is to spray starter fluid in the intake manifold, replacing the gas experimentally. If the car fires, you know by logical elimination or inference that it was fuel NOT being delivered, so troubleshoot the fuel system. 

For compression you need a compression tester and the knowledge to use it, but most mechanics can tell if an small engine has very bad compression in one cylinder by turning the engine over by hand with a wrench on the crankshaft pulley or by using the belt, and by comparing the compression resistance between cylinders. 

Don't be tempted to jump to random causes. It's necessary to use a logical troubleshooting scheme to fix the problem.

Should we get a heat pump?

Maine homeowner: My husband is convinced that heat pumps cost twice as much to run as oil. I think from his hatred of CMP. I don't know anyone who has one to ask, but are they more expensive to run than oil? I'll use 700 gallons of oil or so for a 1,500 sqft house in a year

Intelligent Tinkering: Have him do the math: 

Thermal efficiency of oil heat depends on the age and technology of the furnace, but anything from 60% for the oldest ones, to 90% for the new super-efficient ones. There are 140K BTUs in each gallon of fuel oil. At the current state average of $5.90/gallon, that's just under 24K BTUs/dollar X 90% efficiency, is $1 for 22K BTUs. A 25K BTU heat pump, on the other hand, draws ten amps, which is 2.2 kWh/hour, at 18 cents/kWh (just under) for CMP's standard offer, which is only 36 cents for 25K BTU, roughly a third of the oil price. At the rate you use oil, the heat pump would pay for itself within a couple-three years. And you get summer air conditioning!


Friday, December 2, 2022

Nissan Titan radiator cap failure

Titan owner: I have a 08 titan SE flex fuel, and it just started to blow coolant out of the radiator cap started when the heater valve went out. Has anyone had this issue? Help, please!

Intelligent Tinkering: The coolant is supposed to be pressurized. The usual reason a radiator cap blows coolant is because the radiator cap fails and releases the pressure. The overflow may be blocked or crimped or even frozen (if you live in a cold state and your coolant isn't to spec). There isn't a way for the heater valve to pressurize the cooling system. All it does is allow hot coolant into the cab's heat exchanger when opened. I would just switch out the cap. But I'd check that the overflow pipe is clear first. Just take the cap off (when the engine is cool) and see if you can blow some compressed air through there. Not full pressure. About 20 PSI is enough. I also remember a case when one of my students put water not coolant in their overflow tank and it froze and blocked the pipe.

Thursday, December 1, 2022

Nissan Titan engine hydraulic lock or hydraulicking or hydrolock

Titan owner: (Video: tries to start recalcitrant truck, finds coolant in oil, suspects engine locked or hydraulic-ing.) "Can anybody tell me what this issue might be I’m thinking possibly starter I don’t think the battery would last this long if it were a battery issue, but just some history antifreeze has leaked into the engine and transmission possibly engine lock but just trying to get it started so somebody can take it"

Intelligent Tinkering:If an engine is locked through "hydraulic-ing" AKA hydro-lock (and I'm not convinced this is -- test the battery first with a VOM) you pull the plugs, turn it over on an external power source like a 200 amp starter/charger, and spray some upper cylinder lube in the park plug holes. Be careful. You can bend a rod trying to start a truck locked with water, coolant, oil, or gas in the upper cylinder. That's why you have to get it turning free before trying for a start. It wouldn't hurt to do this even if there wasn't a hydraulic lock. Hydro-lock will nearly always drain down in a normal engine, especially an older one where the rings are no longer tight, so you could just put it on a trickle charge for a few days and try to forget about it and it might start and run and drive. Then you have to figure out why there is coolant in the oil. Probably a head gasket failure. That would give you frothy yellow oil and possibly a hydro-lock.

Nissan Titan: suspect fuel pump or out of gas?

Nissan Titan owner: Had something weird happen with my 2009 Titan SE. I got a low fuel warning saying I had 44 miles left.  Drove to work and when I was leaving, the fuel gauge said I had a quarter tank. OK, whatever maybe it was the way the truck was parked. Drove home with no problems. Was driving into work again and the engine cut out.  Pretty sure I ran out of gas.  Fuel gauge said just under a quarter tank.  Put two gallons in it and couldn't get it started. Battery started dying so I tried jumping it and still nothing, but the fuel gauge changed to almost empty and I got a low fuel warning. Makes sense since I put a couple gallons in. Had to tow it home and it fired right up.  Smelled like it was flooded, but now it's running fine. Any thoughts on what is going on?  The weather has gotten pretty cold, but I didn't have issues last year.

Intelligent Tinkering: If you towed it home and it fired right up by being jumped, then the simplest answer is, you ran out of fuel and then ran out of battery charge. It takes some cranking time for fuel to reach the engine after you put some in after running out. If you're unlucky this is all compounded with a bad fuel pump or one starting to go. Time will tell. If it makes you nervous not knowing, put a can of gas in the truck and get one of those L-Ion jumpers or a spare battery and cables and drive around like that until you know for sure.